I added a few little effects to the cinematic to try and make it look a little better. After getting some feedback on the cinematic the main issue was the blurry name on the side of the shuttle, to fix this I decided to increase the light intensity and re render the shuttle shots, I then lightened the clip a little and sharpened the image to make the A.Lawson 3D easier to read. I did have to re do the motion blur as the new shot didn't have any but this was not a problem. I also decided to add a subtle film grain effect which really does improve the look of the show, even subtlety. I then decided to tweak the colour balance to give it a slightly blue tint which I thought looked quite nice. I am slightly disappointed in how the cinematic looks quite blurry, I can't tell if it is the depth of field blur or the rendering but it is slightly disappointing to see.
Speaking of the whole project I am pleased with how it has turned out. I think the switch from Maya rendering to UE4 was a good idea even though it brought along a whole new set of issues I never managed to solve in engine but did in post processing. If I were to re do this project I would take the week I wasted trying to animate an emissive map in UE4 and spend a lot longer on the high poly version of my ship by putting in much finer details like the panel gaps and hull lights so they wouldn't pixelate like they have done in the texture files. Aside from that I believe that my project has gone really quite well despite the hiccups from the animation of the ship and emissive maps and the lighting from the Maya project breaking the day I decided to change from Maya to UE4 but all of these had work arounds, mostly in After Effects, so in the long run they didn't prove too much of a problem and apart from them I never really encountered any real problems that couldn't be solved with either some experimentation or a tutorial and so the project ran smoothly and it was finished on time and to a standard I'm very happy with.
Final cinematic:
https://www.youtube.com/watch?v=wbvcnmHcqgo
Tuesday, 8 December 2015
Thursday, 3 December 2015
The latest show reel
After lots of hours banging my head against various walls trying to get what I wanted I have finally succeeded. I first made a warp flash effect in After Effects which turned out quite nicely however as the lens flare effect I used as a base take sup the whole scene shrinking it down gives hard edges from where the scene border was. I'm going to try to find some way to blend the edges so it looks less silly. After that I tried to get my engines to glow. I decided to have them pre glowing for my scene and my aim in After Effects was to make them just glow more before it warped away. I managed to do this and it was very effective so I decided to try and go one better and get it to power up from the start. This was less effective as I started with the engines black so in order to get the glow effect to work I had to work with the Alpha channel, which turned all the scenes completely blue apart from the bit which were cut out using the Roto brush tool so I decided to abandon that. While trying to come up with other ways to get around this problem Jason mentioned that I should render out a scene with black engines, one with glowing engines then blend the two together in Sony Vegas. Once the timing was solved this proved to work perfectly and I managed to use this method to power up the engines from black to blue, get the impulse engines to start glowing and have the warp engines glow intensely before warping away. For me this is perfect as it is exactly what I was trying to do in UE4 but failed but now I have finally managed to salvage about 90% of the final idea and that has made me very happy. I'm going to re do the warp flash effect and try to soften the edges as well as try to make it look more cinematic using filters but only if I can find tutorials with results I like the look of but on the whole I would say I am very nearly finished.
https://www.youtube.com/watch?v=1LwX2ihGO7A&feature=youtu.be
https://www.youtube.com/watch?v=1LwX2ihGO7A&feature=youtu.be
Saturday, 28 November 2015
UE4 show reel
I finished rendering out my matinee sequence and it has turned out quite well considering I haven't taken it into After Effects yet to add the warp flash and trying to make the nacelles glow that way instead. I decided to create several very low poly ships and a star base to go in the background as I felt that since this was a ship yard chances are that my ship wouldn't be the only on there so I put 2 ships in the surrounding docks and one orbiting the planet which you can see slowly come into shot at the start. I think this makes the whole scene look more populated and more realistic as I thought there was something lacking when I first saw the fly through which I couldn't quite put my finger on but I think I fixed that issue.
I am a little disappointed in the weird blurred texture when you first see the Prometheus and I am unsure why that happens but it fixes itself in the next shot so if I can't fix it I won't stress too much about it. On the whole though I'm quite pleased considering half the things I wanted to do wouldn't work. Hopefully After Effects will be kinder and allow me to create the warp glow as well as the flash at the end. If I can't do that then this will prove to be a very disappointing project.
https://www.youtube.com/watch?v=GCQmsOXhxTI
Wednesday, 25 November 2015
Big disappointments
This project is proving to be a huge disappointment. After about a week trying to figure out the animating emissive problem I have decided not to sink any more time into it and have given up. This is a huge disappointment to me as it really would have been something impressive that nobody else has even thought to attempt. I do feel that I bit off more than I could chew with this but because I started in Maya the emissive map and the warp stretch were easy to create, leading me into a false sense of security as I just assumed that UE4 would be similar but I was very wrong. Not having the emissive glow is a big blow to the quality of my work and I am very angry and disappointed that I spent a whole week trying to figure out how to use the blueprints, material nodes and matinee to get the map to start glowing when I needed it to and the closest I got was making a slider for a material instance that changed the glow intensity to pre defined limits. Overall I'm starting to regret moving into UE4 for animating however if I hadn't I would be struggling with Mental Ray, render times and trying to use shaders to make 'poor mans PBR' as I can't remember the actual name for the nodes. I think this project might have been a bit to ambitious for my current knowledge level and a bit of a waste as I have not really learnt anything new, other than how not to do things. It wouldn't be as bad if things had eventually worked after my tinkering but they didn't and therefore I never learnt how to use things correctly, which in my opinion is wasted time as I have gotten nothing out of it.
Sunday, 22 November 2015
Rock and a hard place
I'm beginning to question using UE4 for rendering seemed like a good idea at the time however now that I'm having to animate in it I am finding that UE4 has some of the most convoluted ways of animating I have ever seen. I managed to get my ship to stretch slightly before warping off however this was in a tester map and required the use of blend shapes, blueprints and a lot of problem solving. However when I tried to add it to my actual scene it failed miserably and I couldn't figure out how to get it working. In the end I decided to drop it and use a bit of animation to work around it. Animating the emissive texture has been beyond a nightmare and so far no tutorials I have found or have been presented with have worked neither has my messing around with material and blueprint nodes and the whole thing has been incredibly stressful and draining but it is pretty much required for my show reel. Another thing that is required is the blast of air from the umbilical cord however I have no experience with UE4 particles so I have asked for help on the UE4 Answer Hub so hopefully someone will give me some useful advice on how to achieve the results I want. I think I might have bitten off more than I can chew with this project but it's called Advanced 3D for a reason, and boy am I learning some advanced 3D methods.
Wednesday, 18 November 2015
UE4 problems
Now that I am using UE4 to render out my scene I have come across some new problems I wasn't even aware off. To start with learning the Matinee and keying animations is quite confusing. It seems to have the same rough workings as Mayas track editor but it is slightly less intuitive as the camera seems to anticipate what you want it to do and how fast it should move. Whereas in Maya the distance between and number of key frames dictates how fast and the movement of the camera UE4 does not. For example I was trying to get the camera to sweep down and focus on the name of the ship for a few seconds however the UE4 camera decided it wanted to slow to a crawl for a second before going back to the usual fast pace. So far I have yet to find a work around to it.
Another problem was that unlike Maya, UE4 has no way to easily animate the emissive maps which is crucial to my scene as it would look very strange with the ship already powered while in space dock. I did managed to find a UE4 tutorial however which detailed how to make a model switch between 2 textures however when I tried to apply it to the Prometheus it didn't work. I have asked on the Answer Hub and am waiting for a response.
The final issue I am having is with the ship stretching before it shoots off to warp however this might be solved as I have been informed I need to use morph targets in order to get it to animate and hopefully that will give me the results I really do need.
Friday, 13 November 2015
180 turn on rendering
After some decision making and 2 Mental Ray crashes I have reluctantly decided to abandoned it and go to UE4 instead. This decision comes from both my Alpha presentation receiving what I perceived as a less than warm reception to my idea of using Mental Ray and the longer I tried to defend my position the more I realised the I should probably stop defending my position and start rendering something before I run up against the deadline and this was before my lighting broke and Mental Ray decided to stop rendering anything and instead come up with errors so I gave in and decided to use UE4. This is an interesting choice, or so I have been told, to make so late in the module however I disagree as all the textures are sorted out, everything is in the scene, lighting is sorted out and the only thing it needs are the actual animations but since I have the shots worked out in Maya that shouldn't be too much of a problem. The only thing I think I will have issues with are the docking clamps and umbilical cord that will need deforming, the particle effect for the atmosphere escaping from the umbilical cord and the warp engines powering up as the camera passes by. These are going to need some quick research however I am very confident I can get this project finished despite the complete turn around in the rendering department.
Tuesday, 10 November 2015
Alpha presentation feedback
After presenting my alpha build I have to say my confidence has been shaken a little bit. To start with feeling under the weather hampered my presentation so my usual rapier wit was not present, along with a little lack of preparation and trying to rush though to meet the 5 minute deadline. Some of the questions however caught me off guard and really made me consider if I was heading in the right direction with using Mental Ray. Yes it is the definition of the module, learning an advanced 3D method but if it looks terrible, is hard to do and takes ages to render then what really is the point? I wanted to be different as everyone was using UE4 to create their projects I wanted to do something completely different that would look better and after seeing everyone else's presentation and hearing the feedback I really am thinking about using UE4. I'm going to try out my scene in UE4 to see what it looks like but I have to make a decision fast as I am going to need to learn either UE4 animations or Mental Ray. Trying to learn both at the same time will be too much and both will look terrible. On the whole the presentation has not convinced people I'm on the right track but in fact has nearly convinced me that I might be going the wrong way about this whole project.
Friday, 6 November 2015
Small texture update
The textures for the Prometheus have been finished and I decided to put them into Marmoset to see what they look like. I'm very happy with how the textures have turned out considering that it is mostly hand painted in Photoshop. The shipyard and shuttle textures are also completed. I also added a glow map to the Prometheus's engines as the emissive map wasn't giving me the results I wanted to make the nacelles really pop when rendered. I am seriously considering re exporting the Substance Painter textures and Diffuse, gloss and specular as I have decided on rendering the scene in Maya. I just feel that I will get the best result using Maya and it will also give me a great opportunity to try out Mental Ray rendering as it uses advanced methods to get a decent looking render.


Friday, 23 October 2015
The start of texturing
I started to work on the textures before the work sneaks up on me and I run out of time. My original idea was to use Substance Painter to create the whole texture however I felt this would have been too difficult to create certain things like the blue parts to the warp nacelles and the escape pods so I decided to create the base in Substance and then take the maps into Photoshop to add the details. I first created the name and registry, as this is a important part of the ship I had to see how it looked. The result was less than pleasing. I managed to find the font used for ship names on the show however when I added it to the UV map it pixelated a little too much for my liking and so I decided to create an Alpha for it so I could have it in the maximum detail allowed, I also did this for the registry underneath. My next step was creating the nacelle glow which I made using a circular gradient and transforming it to fit the nacelle, this was the same method for the bussard collectors too. I then made the entrance to the shuttle bay, using Voyagers shuttle bay and a little bit of Prometheus reference I created a sort of 'welcome mat' for the shuttle bay and added the ship name and registry. I added some detailing to the nacelle pylons and normal mapped them as they are raised on the actual ship as are the escape pods which I made from scratch by simply making a hexagon with a red cuboid cut to make corners and S.O.S stenciled on. The deflector was fairly simple, I made a light blue circle, cut out the middle and put an Outer Glow effect to replicate the reference image.
My next step is to create the dreaded panel gaps. It is going to need to be very precise and fit both the UV map and the actual curvature of the model and I will need to come up with a way to create it so that it looks at least similar to the reference images. The Aztec detailing shouldn't be too hard as I have created them from scratch before however getting them to link together will be a challenge. I then want to make the textures animated, mostly the impulse and warp engines and the deflector lighting up. I have experience with animating texture glow in Max during college and hopefully Maya will allow me to do something similar so I can get the slowly powering up effect I want and the warp engine glow before the ship rockets off at the end of the show reel.


Tuesday, 13 October 2015
Retouched playblast with music
It took me a while to find a track I liked. I really wanted to use a slower version of TNG intro but couldn't find one that would go with the timing of my playblast. My second choice was a track called Rebuilding The Enterprise from the Star Trek Nemesis where the Enterprise is being rebuilt. This would have gone very well if it wen't for the fact that it is 50 seconds long whereas my playblast is 1 minute 10 seconds and the first 30 seconds are virtual silence and that the timing is completely out of sync with my fly through.
The music I finally settled on was the main menu music from the game Star Trek Legacy. This turned out to be very nearly perfect as he start is slow and builds slowly with the first reveal of the ship, the rises in the music coincided nicely with the reveal of the ships name and the track has a natural 'quiet down' around the minute mark which is perfect for the ship flying off and requires only a fade out in terms of editing. It also gives the warp effect a chance to be heard. I'm slightly disappointed with this sound effect as it sounds odd and not quite like the warp effects I know and wanted however it is the only decent 'clean' effect I could find. There were a few clips from the 2009 Star Trek films however they sound awful and won't fit with my ship in the slightest as the 2009 ships are a completely different design to the classic ships. I like my ships to be detailed right down to the engine sounds.
I will attempt to get a more detailed warp sound from Star Trek Online as I can record game play and take the audio from my ship warping to a new area. If this works I can have a clean, completely accurate warp sound effect that I can time to my playblast.
Another adjustment I made to my playblast is by adding my name and 'Vehicle and Prop artist' to the side of the shuttle the camera follows on the advice of a friend who wanted me to go for a Guardians of the Galaxy vibe and suggested that I should add my name, 3D artist and Vehicle and Prop artist in graffiti to the side of my shuttle to the song Spirit in the Sky by Norman Greenbaum while having exhaust belching from the engines. I immediately shot this idea down as this is the complete opposite of what I wanted however I was intrigued by the 'advertising' idea for the shuttle and I believed that it really could work given the right camera angles and if the camera lingered on shuttle long enough for the viewer to read it. I think this is an interesting idea that, at least in the testers, works rather well and it is something that will hopefully stick in peoples memories for the right reasons.
I also added the background planet with the textures made in Grand Designer. To get the atmosphere effect though I had to create a new sphere and add the clouds alpha to it then added an incandescence colour to create a glowing atmosphere. I also added duplicates of the ship yard to create a little more life in the scene and make it feel like this is a hub of activity instead of a random shipyard in orbit of a random planet.
Playblast link
https://www.youtube.com/watch?v=AdgPi0yjENc&feature=youtu.be
Saturday, 10 October 2015
The 3rd playblast attempt
After the feedback given during the presentation I re animated my playblast to do what was suggested and the early tests look promising. Following the shuttle to reveal the ship is a really nice transition and even in the test looks very good. I have also slowed down the sweeping shots too and given time to show off key parts of the ship like its name and registry number, the deflector array and the nacelles, although all 4 are the same only one was needed. The umbilical cord detaching still seems a little fast as does the lead up to it where I plan to fly past the nacelles as the power up finally finishing on the impulse engines as they power up, then cutting to the umbilical detaching with the particle effect so this will probably need to be slowed down. Also as the ship goes to warp the stretching animation seems a little too long so that needs to be sped up, aside from those little problems I believe this playblast test has been a success especially for the camera angles. I feel that they show off the model well and once it is textured and lit will really show off the model to its full potential.
Here is the link to the video:
https://www.youtube.com/watch?v=eKkXMggZNjU
Here is the link to the video:
https://www.youtube.com/watch?v=eKkXMggZNjU
Wednesday, 7 October 2015
Grand Designer
After the feedback I got after the presentation I decided to check out Grand Designer to create the planet I would need for my scene and I have to say it is a very powerful tool. After about 10-15 minutes I created a planet, the link to a quick video is below.
https://www.youtube.com/watch?v=0dSZdHO60Sg
This impressed me very much but unfortunately I reset it by accident. This is where I found that I couldn't reload the preset I made of it. Every time I tried to reload it, it wouldn't. I have no idea why.
This was frustrating however not as frustrating as the fact that I can't export the planet as an FBX file, only a Unity file or UE4 project. The problem for these are Unity won't export as an FBX or OBJ file. I found a work around for this by adding a section of code into the project file but this didn't work. Neither did UE4 which refused to open the file for what I suspect to be an engine build conflict with the exported file and the build I have installed. It would be very useful if I could export it to FBX as my planet has rings on it and it would be hard to get right if I were to make it in Maya. I can export the textures but as they render out as PBR they looked a little funny in Maya, as I intend to do my final render using Maya software.
This is a bit of a double edged sword. On the one hand the software is very powerful, easy to use and gives some really fantastic results and on the other it is impossible to get the finished model into Maya where it is needed. As I have a spherical plant this isn't a massive problem but I also added rings too it which I really do need and if I wanted asteroids in my scene I really would need to export them into Maya. More research will definitely be needed on this and I will hopefully find a solution.
Second playblast
After feedback for my first playblast I was told that not only was it too fast, which I already knew, but the actual camera shots needed much more work. The result can be seen below in the link.
https://www.youtube.com/watch?v=ublB8AYqMlo
To get an idea of what would be good shots I watched some clips, mostly from Star Trek, of ships in space dock the best video of which was the ending of Star Trek Nemesis where the Enterprise was being repaired in space dock. The panning shots gave me good ideas on how to show off my model to its best. After slowing down the animation I also decided to do close passes of the ship rather than the whole dock. I am going to have to make the textures very high quality because the camera goes so close. I kept the warping away shot as I really do like that idea and gives a little more life to the model rather than just slowly pulling away. It also gives a clear ending point to the reel.
During the feedback I was also given tips on time management and what I need to prioritize. After that I decided that as my model was mostly finished I would focus on researching particle effects for my air explosion from the retracting umbilical cord and Adobe After Effects for the warp away flash. I have some experience using After Effects so I believe I will be able to get a nice looking effect for my finale, hopefully giving it the punch it needs.
The new camera shot reference
While the idea for this shot came from Jamie referencing a scene in Star Wars the reference I found was from the first episode of Star Trek Voyager showing the reveal of Voyager, the link to which is below.
https://www.youtube.com/watch?v=jKUINTDndBM
This shows very well what I have in mind for my new fly by animation. The reveal for the ship should really be a big thing, it should surprise the viewer and wow them instantly and currently it isn't doing that.
One idea is to do something very similar and have the shuttle fly around the ship before the camera breaks away to follow the Prometheus into warp. This I think will be much more effective as not only will you be able to see close ups off the ship but also of the shuttle, which would normally go unseen as they're quite small.
The shots from the video are also slow and sweeping which is something I will try to replicate with my shots.
Tuesday, 6 October 2015
Alpha presentation feedback
After presenting my presentation to a small group of peers I got some very useful feedback on my work. The best feedback I got was for a camera shot. The idea was to follow one of the little ships, I was thinking of using a shuttle, with the camera, leading the viewer into an impressive reveal of the Prometheus. It was also suggested to slow down the camera even further and skip one side of the model, as it's mirrored it was agreed to be pointless to take the viewer down both sides of the model when both sides are identical. The program Grand Designer was also suggested to create good looking planets for to add an additional subtle light source for the scene. After looking for the program on Steam I was very impressed by the quality of the planets created and the level of customization available as you can create planets, moons and asteroids of all shapes, sizes and types. This will be massively useful too me as I can use it for this and future projects. Another bit of feedback was to add more edge loops to the underside of the ship as they picked up on some shadowing issues. I also found some odd geometry in the shuttles where the canopy connects to the main body, I will look into it but I think that it will be easy to rectify by deleting faces and pulling the canopy edge loop into the back of the shuttle. Hopefully that is the only problem with it and deleting faces would make things worse. Aside from them the presentation went well, my point was well received and people liked my idea and most importantly I got some fantastic feedback and tips.
Wednesday, 30 September 2015
Finalization of plans
After discussing my 3 main projects with the lecturers I settled on the Prometheus class on the advice of my lectures as they felt it was the most interesting, looked the best and had the most potential as an interesting project.
Most of the work has already been done over the summer as the model is finished aside from getting feedback from peers and I have created a normal map for it using a high poly version I made using Sub D methods. One of my lectures also gave me tips on good fly by locations to get good shots of the Prometheus the link to the test which is below.
https://www.youtube.com/watch?v=gybCdmRU7vU
The animation is rather fast so I will explain some parts of it. The shuttles and workbees will be flying round the ship and the shipyard and the camera will be flying slow enough to see them move. Before the ship moves off the umbilical cord will detach with a small explosion of air as it disconnects. The nacelles will stutter blue then start to glow as will the red impulse engines. As the ship warps away the nacelles will glow an intense blue and once the ship has gone there will be a flash of with light.
After getting feedback and explaining that the animation is too fast and that it will be refined later on people said that it looked quite good.
To improve it I will certainly slow it down and re key the animations. I will also make the animations smoother and add animated textures and also the said particle effect, which will need research and experimentation.
I hope to have the effect researched and tested by the time texturing becomes necessary as I would like to get it out the way now, if it's simple or if it isn't then I want to have the time necessary to fix whatever issues arise and perfect it to make it look correct and believable.
Monday, 28 September 2015
123D Catch experiments
As part of my dissertation I will be using the 123D Catch software to create 3D models using only pictures. While it is solely for my dissertation I can also use it to supplement scenes in my A3D project with it.
I am currently experimenting with the program using two models I have to hand, a Steamrunner class ship from Star Trek and Cortana from Halo, and I have had varying success.
However I have learnt a lot about the program. I have found out that the user has no modeling input whatsoever. The only changes you can make is by stitching together other images using reference points that you select or 2 different pictures. Each time this is done though the model has to be resent to be rebuilt using the new images as points of reference which takes a lot of time. Another thing I have discovered is that the minimum required images is quite high. I found that anything less than 40 pictures will get unreliable results, as will taking pictures using different quality cameras as my camera ran out of battery so I tried to take some extra pictures on my phone. This created a very poor quality picture if it could even be called that, it was fuzzy and there was no detail, just a mash up of colour.


I am currently experimenting with the program using two models I have to hand, a Steamrunner class ship from Star Trek and Cortana from Halo, and I have had varying success.
 |
| Steamrunner |
 |
| Cortana |

The Streamrunner class was the most successful model although the underside of it was completely missing. This proved impossible to fix as the pictures of the underside wouldn't stitch with the others. The top half worked very well and would have needed very little work, mostly deleting and bridging gaps in the topology however the underside would have required extensive modeling. The pictures had no real structure to them, I simply took lots of pictures from various angles hoping it would work.

The model of Cortana however was a nightmare. As you can clearly see this model will need a massive amount of rework and even rebuilding. Her back is also missing and the rear of the base is completely the wrong shape. The face is completely lacking in detail, the only detail being her nose. The left hand is un-usable and would need to be completely re made. The only part of the model I am happy with is the display she is holding which appears to be clear and would only need the surrounding environment deleting and possibly extruding the display as it is a little 2D. I can't say why the model has turned out like this as the Streamrunner looked fine. It is possible that, as I used a high quality camera phone for Cortana rather than my actual camera, the photo quality has contributed to it. I will only know once I get my camera charger back. It is also possible that the material Cortana is made from contributed to the above image, again I can only know for sure once I get my camera back.
My next plan is to try this software out on buildings and interiors along with different styles of lighting as one idea I have is to 3D model a network of caves so interiors and lighting will be a big thing I need to research and will be my main focus, once my camera is charged.
Sunday, 27 September 2015
ADF-10 Falken idea
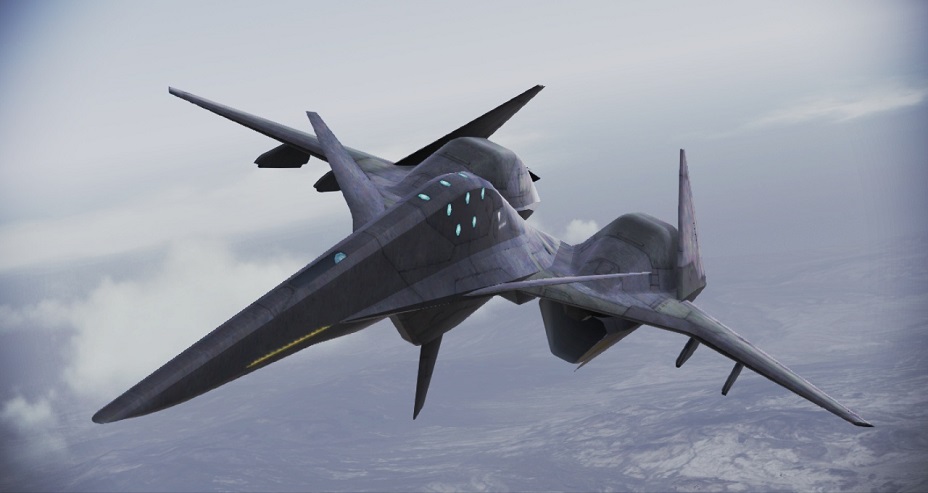
My third idea is a fighter plane called the ADF-01 Falken from Ace Combat: Assault Horizons Legacy. I particularly like this plane as it has some interesting shapes and an unusual cockpit and looks surprisingly imposing.
 |
| ADF-01 Falken (1) |
 |
| (2) |
During the modeling phase I worked on a high poly version of both the plane and the cockpit with a fair bit of success. I found that using xNormals and Maya normal map renders were quite poor with lots of errors so I decided to try and render out a normal map using Substance Painter. This proved to be a great idea as the map came out with very few errors, after a little experimenting as I realised that the normal map was rendering at a 512 x 512 where as the texture sheet was a 4096 x 4096 giving very blurry results but once I realised that and that using a cage file actually creates horrible errors the map rendered almost perfectly, I even rendered an AO map just to add a little extra detail to the models. The cockpit normals however have some strange errors which I will look into.
Making the cockpit however has been a slightly harder job with some artistic license needed as the cockpit is hardly ever on show, as you can see from the below picture.
 |
| (3) |
This required me to go looking for other reference images for other components such as seats, pedals joysticks and throttle controls to add to the cockpit to actually make it look like one.
 |
| (4) |
Below are some images of where I am at currently with the model.


 |
| The normals for the cockpit have some strange errors which I will look into |

If I were to pick this for my project I would certainly try the photo scanning technique to create some none important assets to help me better understand the technology for my dissertation. I think it would also help me show how versatile I can be as I can create both a vehicle and an environment, if the hanger can be classed as one. This feels like the most promising project to follow through with as I can get a lot of experience in a variety of things that will prove very useful later on.
References:
(1) http://image01.seesaawiki.jp/a/y/ace-infinity/2424944bc377b58f.jpg
(2) http://orig00.deviantart.net/11fd/f/2011/173/3/3/adf_01_falken_2_by_lolmanic45-d3jom9x.jpg
(3) http://i.ytimg.com/vi/eZM9_g4LODc/maxresdefault.jpg
(4) http://images.nintendolife.com/news/2014/11/bandai_namco_announces_ace_combat_assault_horizon_legacy_plus_for_3ds/attachment/1/630x
Prometheus class idea
My second idea was a Prometheus class starship from Star Trek and is my least developed idea. I decided to have it in spacedock simply to give it a more interesting setting. This model proved very interesting and quite frustrating to build as there are some organic curves in both the saucer section and engineering sections which proved difficult to model accurately. This could be helped by a high poly version making the areas smooth and flowing. The below image should help explain the locations.


I also bought a small model of the Prometheus class to assist with the modeling process and it did prove invaluable for getting different angles to work from. Currently this project is also on hold as I am unsure how best to texture the model. If I were to pick this for my project a high poly Prometheus is a must and also nailing down how to texture it. I feel Substance Painter would be a good way to do it however I would need more experience in adding decals and how to add panel lines, both of which I'm sure I could find tutorials for.

Other shots of the various parts of the model


 |
| The completed model |
X1 Alpha idea
 |
| (1) |

After getting feedback from peers they felt the model was too boring with not enough interesting geometry too it. My personal opinion was that the visor was completely wrong and the rear of the model was no way near detailed enough so I went back to reference imaging and found a blogger post (2) of a very detailed model which I used to fill in some of the gaps to make my model more detailed resulting in this version
 |
| Rendered in Maya |
 |
| Rendered in Marmoset 2 using PBR textures |
 |
| (5) |
 |
| Screenshot from Substance Painter |
Unfortunately Substance Painter has started crashing every time I try to open this project so it has been placed on the back burner. If I were to use this idea as my project the first thing I would do would be to create a high poly version of it and put it in a scene. This was something I did with the original model however my peers said that he diorama actually overpowered the model so if I were to do a diorama again it would have to be something subtle that complimented the model instead of take it over. I would also work on learning Substance Painter and learn more tricks to get better results to really make my model pop however this could be said for all my ideas.
References:
(1) https://upload.wikimedia.org/wikipedia/ru/b/b2/459030-future-cop-l-a-p-d-windows-screenshot-future-cop-vs-tank-platoons.jpg
(2) http://ben-yohanan.tumblr.com/post/62044682236/tac-x1-alpha-referenced-from-eas-futurecop
(3) https://www.facebook.com/groups/tenthousandhours/
(4) https://www.facebook.com/groups/nextgenhardsurface/
(5) http://ben-yohanan.tumblr.com/post/62044682236/tac-x1-alpha-referenced-from-eas-futurecop
(6) https://www.youtube.com/watch?v=u5p95HTvVsA&index=10&list=PLB0wXHrWAmCyJEDZLLQvusBxDbskFmh9K
Starting ideas
Over the summer break I decided to keep my modeling skills sharp by doing some modeling of things I really really enjoy. I had 3 models that have already been finished and UV'd from games and T.V. The first model I worked on was a personal favorite of mine and something I thoroughly enjoyed working on, this was the X1-Alpha robot from the little known hidden gem Future Cop L.A.P.D. This gave me lots of hard surface modeling experience which I have applied to other models. The second model I chose was a Prometheus class starship from Star Trek. This model featured the ship itself in a cage like shipyard with work bees and shuttle craft flying around. This was a rather large model with lots of intricate parts and some interesting geometry connecting the saucer section to the engineering hull which proved to be a challenge to get the geometry looking right. The final model I decided to make was an ADF-10 Falken from the game Ace Combat: Assault Horizons Legacy on the 3DS. I had recently gotten back into playing Assault Horizons and wanted to recreate one of my favored planes and also practice my high poly modeling skills, something I had neglected to work on as I found it confusing and it seemed like a waste of time to me. Nevertheless I did manage to make a high poly version of it with some success.
These are just ideas for my project but it would seem like these are good options as all models are finished bar some refinement and texturing and it would save me a lot of time and searching for ideas.
One idea I had before I realised that my 'pre-made' models were an option was to re create Commander Shepard's apartment from the Mass Effect 3 Citadel DLC and possibly to take some artistic license and add some features from some of the concept art which I felt would have been a much better idea to include in the finished model. While this would have been a nice idea it is much more geared towards environment rather than vehicle or prop modeling which I feel is where my strengths lie. However it is a game I am very passionate about, the Citadel DLC more than most so I might be able to pull it off through my sheer passion to get it done right.
This is a brief summary of my ideas but I will create an individual post for each one to go into much more depth.
Subscribe to:
Comments (Atom)